Making Cheese Curds at home
- Marie Overton

- Mar 16
- 3 min read
Cheese curds offer a unique taste and texture that cheese lovers appreciate. These small, fresh pieces of curdled milk are the building blocks of many delicious dishes and snacks. Whether you want to make them at home or learn how to enjoy them in various ways, this covers everything you need to know about cheese curds.
What Are Cheese Curds?
Cheese curds are the solid parts of milk that form when milk coagulates during the cheese-making process. They have a mild, slightly tangy flavor and a distinctive squeaky texture when fresh. Unlike aged cheeses, cheese curds are best enjoyed fresh, as they lose their signature texture over time.
How to Make Cheese Curds at Home
Making cheese curds at home is simpler than many expect. You only need a few ingredients and some basic equipment.
Ingredients
2 gallons of whole milk (preferably not ultra-pasteurized)
1/2 teaspoon liquid rennet (available online or at specialty stores)
1/2 teaspoon calcium chloride (for a firmer curd)
1 packet dry or 4 ounces prepared thermophilic starter
Equipment
Step-by-Step Process

Heat the Milk
Pour the milk into a large pot and slowly heat it to 96°F (36°C). Use a thermometer to check the temperature accurately.

Ripen the Milk
Remove the pot from the stove, place a lid on it, and allow it to sit undisturbed for 90 minutes.

Add Calcium Chloride
Stir in 1/2 teaspoon calcium chloride gently. This helps the milk to firm up and is especially important when using pasteurized milk.

Add Thermophilic Starter
Stir in 1 packet of dry or 4 ounces of prepared thermophilic starter. This helps with flavor, texture and protects against harmful bacterial growth. It must be thermophilic to withstand the higher temperatures this is cooked to. Place the lid back on and allow it to rest for 30 more minutes.

Add Rennet
Dilute the rennet in 1/4 cup of cool, non-chlorinated water. Stir it into the milk gently for about 30 seconds.
Let the Milk Set
Cover the pot and let it sit undisturbed for 30 minutes. The milk will form a gel-like consistency.


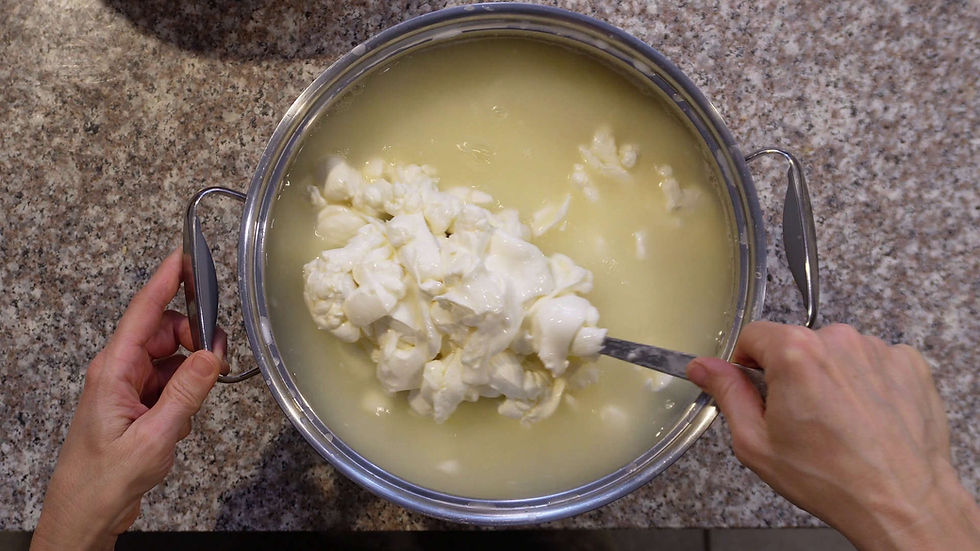
Cut the Curds
Using a long knife, cut the curd into 3/4-inch cubes. This helps release the whey.
Cook the Curds
Slowly over 30 minutes heat the curds to 116°F (47°C) while gently stirring regularly. Maintain that temperature while regularly stirring for 30 more minutes. This step firms up the curds.

Drain the Whey
Pour the curds into a colander over a bowl to drain the whey. Set the colander back in the pan.

Place a small plate and a layer of plastic wrap over the cheese. Add a 8 pound weight to the top and let it drain for 1-3 hours. (I like to use my whey for my garden plants. It is high protein and low fat, so it is good for my animals too.)
Salt and Store

Break the curds into quarter size pieces.

Sprinkle salt over the curds and mix gently. Taste it regularly to determine if it needs more. Cheese curds are best eaten fresh but can be refrigerated for up to a week.
How to Use Cheese Curds
Cheese curds are versatile and can be enjoyed in many ways. Here are some popular uses:
Eat Them Fresh
Fresh cheese curds have a mild flavor and a squeaky texture that many find addictive. They make a great snack on their own.
Make Poutine
Poutine is a classic Canadian dish that features cheese curds melted over hot fries and topped with gravy. The curds soften but do not fully melt, creating a perfect balance of flavors and textures.
Add to Salads
Toss fresh cheese curds into salads for a creamy, tangy bite. They pair well with greens, nuts, and fruits like apples or pears.
Use in Cooking
Cheese curds melt well in dishes like grilled cheese sandwiches, omelets, and casseroles. They add a fresh cheese flavor and a gooey texture.

Tips for Buying and Storing Cheese Curds
Buy Fresh: Cheese curds taste best when fresh. Look for curds that are firm and slightly moist, with a mild aroma.
Store Properly: Keep cheese curds in an airtight container in the refrigerator. Use them within a few days for the best texture.
Revive Squeakiness: If curds lose their squeak, briefly microwave them or warm them in a pan to restore some texture.
Health and Nutritional Benefits
Cheese curds provide protein, calcium, and essential vitamins. They are a good source of energy and can be part of a balanced diet when eaten in moderation.
Experiment with Flavors
Try adding herbs, spices, or smoked salts to your cheese curds for unique flavor twists. You can also coat them in breadcrumbs and fry them for a crunchy snack.


Comments