How to Sew Bunny and Heart Candy Bags for Easter and Valentines Day
- Marie Overton

- Jan 28, 2021
- 4 min read
Updated: Feb 15, 2025
If there is anything I love, it's the holidays. Being a mom, I find so much joy in the traditions and family togetherness that are a part of them. Making adorable little crafts are just a bonus. I have a daughter who is off at college and a son who is getting ready to leave on a mission for our church. So, when my friend showed me these cute holiday crafts she makes I thought it would be perfect for adding to their care packages.

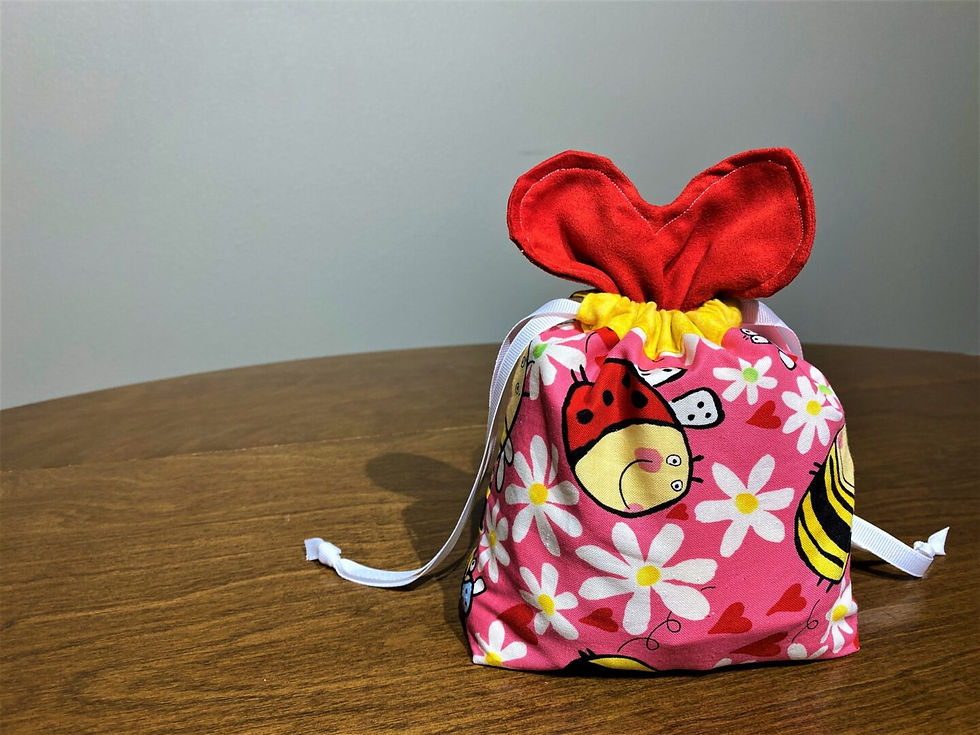
Valentine Heart and Easter Bunny Bag
Candy Bag Supplies:

Supplies
The first step in preparing your fabric is to iron it.

After your fabric is ironed begin by cutting out the pieces that you need from the associated fabrics. Cut two 8.5 inch squares on the fold. Cut one for the lining and one for the outside of the bag. If you are using scrap fabric and do not have enough to cut on the fold cut two 8 1/2″ squares and sew them together on one edge.
If you are making the bunny bag cut 4 pieces of fabric for your ears or if you are making the heart bag cut two pieces of fabric for your heart.
You can use different colors for the front and back of the ears or the same. This is a great project for using your scrap fabric. Place them right sides together and prepare to sew. You may pin them together if you wish.

It is now time to sew the bags. There are multiple steps to this process.
First, if you are adding lace to your bag you should attach it to your bag, ears, or heart at this point. You should prepare the lace by laying it right side up over the correct side of your fabric and cutting it a little larger than the bag, ears, or heart. Sew it onto the bag and then trim the edges flush with the side of the bag, ears, or heart.


Next, we sew each of the interior and exterior bags individually and then sew them together. Begin by pinning the sides of your bags approximately 1 inch from the top and sew down the sides.
Now it’s time to prepare your corners in order to have a flat-bottom bag that stands up on its own. We do this by folding the corners with the side seam of the bag lined up with the center of the bottom of the bag. Pin each corner of each bag section. Sew 1 inch in from the point. Trim the excess.


This next bit can be a bit tricky, make sure you watch the video if you need a detailed tutorial.
Keeping the bags inside out, pin the tops together and sew around 3 of the 4 edges. Be careful as you sew the one short side. The other short edge should be left un-sewed so you can turn your bag. Tip: When sewing the short side sew half of the short edge, take the bag off the sewing machine and flip the bags to the other side and sew the second half of the short edge.


Turn both sides of your bag inside-right through the short side that was left un-sewed and tuck one inside the other. Make sure that you press your fingertip or use a pair of turning tweezers to pull out the corners of the sewn short edge.
Finish the remaining short edge by turning the edges and sewing them closed.


It’s time to prepare our bunny ears or hearts. To do this hold the front and back of the bunny ears and hearts right sides together. Sew with a 1/4 inch seam allowance with the right sides together along the top edges leaving an opening at the bottom of the bunny ears or sides of the heart for turning. Turn right side out.
Press the edges to make them crisp. Sew the opened turning hole closed as close to the edge as you can. You may even want to top stitch and create an adorable design around the edge as we did on the heart. You are now done with the decoration and can create the ribbon channel and attach the bunny ears or heart to the candy bag.


To create the channels that the ribbon is pulled through you need to iron the top openings down and pin them in place. While these are ironed down, but before you sew them find the center of your bag and pin each of your ears to either side of center. If you are making the heart bag pin your heart to the center of your bag.
It’s time to sew. Sew as close to the edge of the folded edge to create the channels. Make sure as you pass your bunny ears to sew them in and not miss them as it is a very close edge to sew. The heart expands past the edge of the ribbon channel and is therefore easy to sew into place.


The FINAL step is to run two pieces of ribbon through the channels and tie them on opposite sides to create a double drawstring. Trim your ribbon edges and pull the drawstrings to test how well they work.
The last and most important part of the entire project is to ADMIRE your beautiful candy bag.


That’s it, you have super cute candy bags to fill and add to Easter Baskets or hand out at Valentine’s Day. I assure you the kids … or any recipient … will love these.


Comments