Replacing the Sealing Ring in Your Vintage Pressure Canner Made Easy
- Marie Overton

- Mar 18
- 4 min read
Pressure canners are essential tools for preserving food safely, especially when dealing with low-acid items like vegetables, meats, and soups. If you own an older pressure canner, you know how reliable these vintage models can be. However, one part that often needs attention is the sealing ring. Over time, the sealing ring can wear out, crack, or become brittle, which compromises the canner’s ability to maintain pressure and seal properly. Replacing this ring is a straightforward task that can extend the life of your pressure canner and keep your food preservation safe.
This guide walks you through the process of replacing the sealing ring in an older pressure canner, with practical tips and clear steps to make the job easy and stress-free.
Why the Sealing Ring Matters
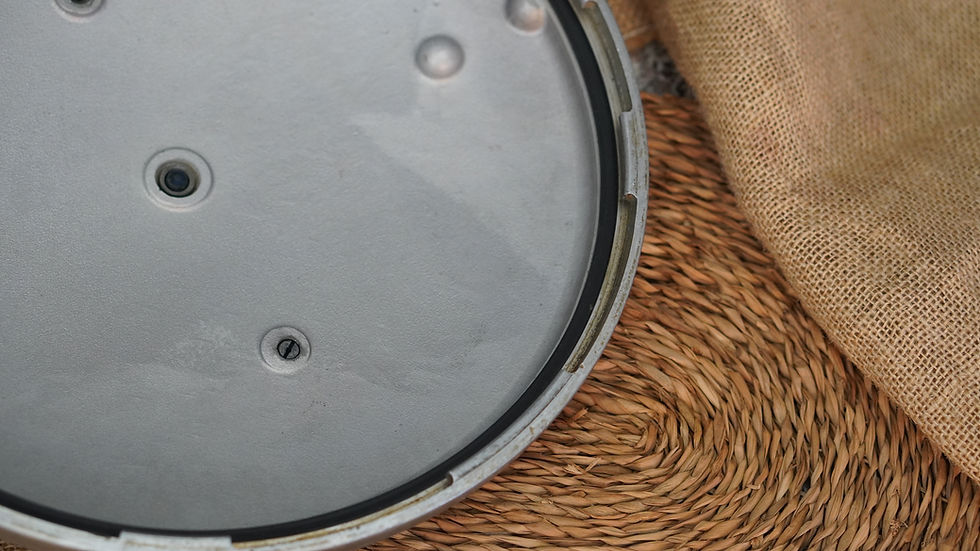
The sealing ring, sometimes called a gasket, fits snugly between the lid and the pot of your pressure canner. Its job is to create an airtight seal that allows pressure to build inside the canner. Without a good seal, steam escapes, pressure won’t build properly, and your food may not reach the temperatures needed for safe preservation.
Older pressure canners often use rubber sealing rings that degrade over time. Signs you need a new sealing ring include:
Difficulty reaching or maintaining pressure
Steam leaking from the lid edges
Visible cracks, brittleness, or deformation on the ring
The ring feels sticky or hardened
Replacing the sealing ring ensures your pressure canner works efficiently and safely.
Finding the Right Replacement Ring
Before starting the replacement, you need to find the correct sealing ring for your canner model. Here are some tips:

Check the manufacturer’s name and model number on the canner or lid. This information is usually stamped or printed on the lid or handle.
Look for replacement parts online or at kitchen supply stores that specialize in canning equipment. Many brands still offer parts for older models.
Choose the right material. Most sealing rings are made from food-grade rubber.
Replace the emergency pressure release at the same time as this is made out of the same material and usually comes with the new seal.
Avoid using generic rings that do not fit properly, as this can cause leaks or unsafe pressure levels.
Preparing for Replacement
Before you remove the old sealing ring, prepare your workspace and tools:
Gather tools such as a soft cloth, needle nose pliers, and a small flathead screwdriver to help pry out the old ring and emergency pressure release.
Work in a well-lit area to see the ring clearly and avoid damaging the lid or new ring.
Make sure the canner is completely cool and not under pressure before starting.
Step-by-Step Guide to Replacing the Sealing Ring

Remove the old sealing ring and emergency pressure release
Gently pull the old ring out of the groove around the lid’s edge. If it’s stuck, carefully use needle nose pliers or a flathead screwdriver to pry it loose. Avoid sharp tools that could scratch or damage the lid.
Clean the groove
Use a damp cloth and mild detergent to clean the groove where the ring sits. Remove any food residue, dirt, or old rubber bits. Dry the groove completely before installing the new ring.
Inspect the lid
Check the lid for any dents, warping, or damage that could affect the seal. If the lid is damaged, replacing the sealing ring alone might not fix pressure issues.

Install the new sealing ring
Align the new ring with the groove and press it evenly into place. Make sure it fits snugly all around without twisting or bunching. The ring should sit flush with the lid edge. The last little bit it the hardest but it you continue to work with it, it will eventually fit.

Test the fit
Close the lid on the canner pot and check for gaps or uneven pressure. The lid should fit securely and feel tight when locked. Lastly, add the new emergency pressure release. It should pop in very easily.

Tips for Maintaining Your Sealing Ring
To keep your new sealing ring in good condition:
Clean it after each use with warm, soapy water and dry it thoroughly.
Avoid using harsh chemicals or abrasive scrubbers that can damage the ring.
Use food grade mineral oil to lube the ring once a year or more frequently if needed.
Replace the ring depending on use and condition.
Regular maintenance helps prevent leaks and ensures your pressure canner works safely.
When to Seek Professional Help
If you notice persistent pressure problems after replacing the sealing ring, or if the canner lid is damaged, consider consulting a professional or contacting the manufacturer. Some older models may require additional parts or repairs to function safely.
Final Thoughts
Replacing the sealing ring in your vintage pressure canner is a simple task that can save you money and keep your food preservation safe. By choosing the right replacement, cleaning and installing it carefully, and maintaining it properly, you can enjoy many more years of reliable canning. Take the time to inspect your canner regularly and replace worn parts promptly to avoid any safety risks.


Comments