


Dream Chicken Coop Build

We finally outgrew our little chicken coop, and honestly, it felt like a very good problem to have.
Our family goes through a lot of eggs, and as our flock grew, that sweet little starter coop just wasn’t cutting it anymore. I wanted something bigger and more practical, of course, but I also wanted it to feel special. If I’m going to be out there every morning doing barn chores, I might as well be walking into a space that makes me happy.
So I started dreaming up a new coop, one that pulled in some of the same details from our greenhouse. I wanted it to feel like it belonged on our property, not like an afterthought tucked into the yard. Reclaimed doors, antique windows, exposed trusses, a copper metal roof, stained wood, painted trim, a pretty roost, a proper dust bath, storage, ventilation, and easy egg access were all part of the plan from the very beginning.
This was not a quick weekend project. It took planning, measuring, concrete, framing, plenty of bracing, and a fair amount of “hold this right here while I check if it’s level.” But it became exactly what I hoped for, a beautiful, useful coop that fits our family and our property.
Designing the coop before we ever picked up a hammer
Before we started building, I drew the whole coop out on grid paper. That step saved us so many headaches.
Because I wanted to use antique window frames and reclaimed doors, I couldn’t just build a standard frame and figure out the pretty parts later. Old windows and doors are charming because they’re unique, but that also means they don’t usually come in convenient, modern, predictable sizes.
So the design had to work around the pieces I wanted to use.
I planned where the antique windows would go, where the doors would fit, how the coop portion would sit inside the run, and how we would access everything for daily chores. I also wanted the back corner of the coop elevated, with the nesting boxes at the back. That way, gathering eggs would be simple and comfortable.
One of my favorite practical choices was placing the coop clean-out door at wheelbarrow height. Cleaning a chicken coop is never going to be glamorous, but future me will always be grateful for anything that makes it easier. Being able to pull a wheelbarrow right up to the door will make bedding changes so much easier.
The front of the structure has a full-size door, which makes the whole coop feel more like a little outbuilding than a cage. I love using reclaimed doors because they add instant character, but they do require some planning. You really need to find them before you start building, so you know the exact height and width you’re framing for.

For the smaller coop door, I used a solid wood door that I found secondhand and cut it in half. Since the door was inexpensive, it was a very affordable way to get a sturdy, custom-looking piece.
A few design choices I knew I wanted from the start were:
Antique window frames for charm and light
Reclaimed doors to give the coop character
An elevated coop corner for better egg access
A wheelbarrow-height clean-out door for easier cleaning
A full-size front door for comfort and access
Exposed king trusses for both strength and beauty
A copper metal roof to tie it in with the look of our property
That early planning helped the build feel much less random. Every pretty feature had a job, and every practical feature still had room to look good.
Starting with a square and sturdy foundation
Once the design was on paper, we chose the location right next to our smaller coop. That made sense for the way we already use the space, and it helped the new coop feel connected to our existing chicken area.

The first real step was preparing the ground. We removed all the vegetation from the build site and leveled it, then dug a trench for the concrete foundation. This part isn’t fancy, but it matters so much.

If the foundation is off, the whole building fights you the rest of the way.
When we built the concrete forms, we took our time getting everything straight and square. It can feel slow in the moment, especially when you’re excited to see walls go up, but a square foundation makes every later step easier. Framing, roofing, doors, trim, and windows all depend on that base being right.

We added rebar for structural support, which is not a step I’d skip.

First, we poured the footers.

Then we poured the stem wall, connecting it with rebar so the whole foundation worked together.

Once the concrete was ready, we placed pressure-treated wood on top of the stem wall. That gave us a solid, durable base to frame from and helped protect the wood sitting closest to the concrete.
Concrete work is one of those parts of a project where you don’t see the “pretty” yet, but you’re building the bones. A coop with reclaimed details and a copper roof still needs a strong, level foundation underneath it. Especially when you’re building something you want to last.
The pretty details are fun, but the straight, square foundation is what makes the pretty details possible.
Framing the walls and building around reclaimed pieces
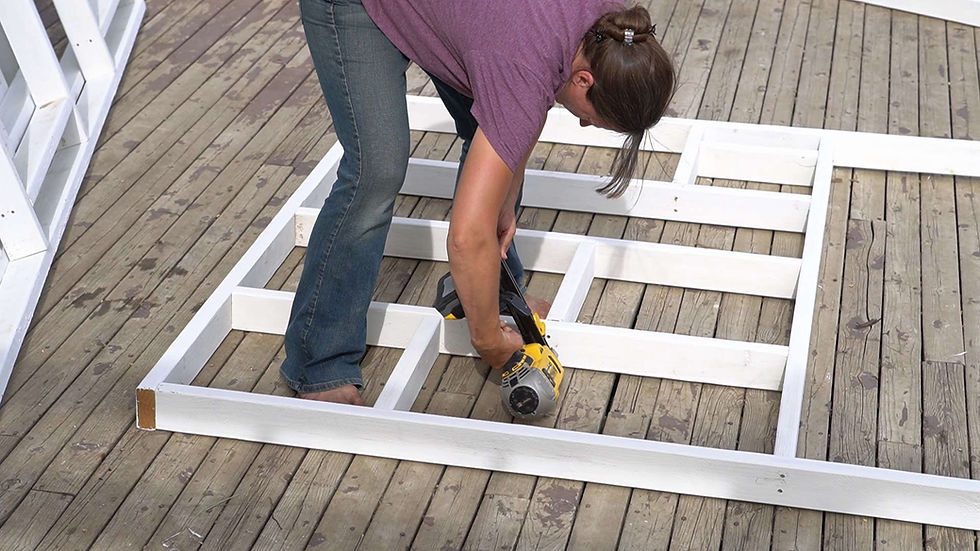
We framed the walls on our back deck, which gave us a flat, convenient place to work. Since I already knew where the antique windows and reclaimed doors were going, we framed each wall with those openings in mind.
That’s one of the little tricks with using reclaimed materials. They can save money and add so much personality, but they also make you slow down. You can’t assume anything is a standard size. You have to measure each piece, then build around what you actually have.
After the walls were built, my husband and I carried them over to the foundation and started connecting everything. This was the stage where the coop finally began to feel real.

Because so many of the walls would be wire, this build needed a lot of bracing. Fully sheathed walls naturally add strength, but wire walls don’t stiffen a structure in the same way. We had to brace carefully as we went so the frame stayed straight and secure.

Once we added sheeting around the corner that would become the enclosed coop area, the whole building felt much stronger. After the sheeting went up, it started to look and feel like a real structure.
To build the coop portion inside the run, we added a post in the center of the run. That gave us something solid to connect to and made the interior framing work the way it needed to.
We also added a window in the coop area that can open and close. Ventilation is a big deal in a chicken coop. Chickens need fresh air, but the coop still needs to feel protected and comfortable. An operating window lets us adjust airflow depending on the season and weather.
This stage had a lot of small decisions that really mattered:
Where the coop walls would tie into the run
How much bracing the wire walls needed
Where the operating window would sit
How doors would swing
How we’d move through the space during chores
How the chickens would use the covered and open areas
It’s easy to focus only on how a coop looks from the outside, but the inside flow matters just as much. If daily chores are awkward, you’ll feel it every single morning.
Making the trusses beautiful enough to leave exposed
One of my favorite parts of this build was making the trusses.
I wanted exposed king trusses because they add strength, but also because they’re just beautiful. Since they would be visible, I didn’t want them to look like an afterthought.

To make them consistent, I built a form on our back deck. That way, each truss could be assembled the same way. If you’re making more than one of anything for a build, a form or jig is so helpful. It keeps everything uniform and saves a lot of measuring and second-guessing.

Once the trusses were made, we carried them over and set them on top of the walls. That was another “now it looks like a building” moment.

There’s something about adding roof structure that changes everything. Suddenly you can see the shape. You can imagine the finished roofline. You can picture the building standing there for years.
After the trusses were in place, we added the roof sheeting. That really pulled the whole structure together.

Later, we added the copper metal roof, and it completely elevated the look of the coop. It adds warmth, character, and just enough charm without making the coop feel too fussy.
The roof is one of the details that made this dream chicken coop build feel like more than just a practical farm project. It became a little building I love looking at.
Adding windows, doors, wire, paint, and trim
Once the main structure was up, we moved on to the details that gave the coop its finished personality.

We installed the antique window frames and the reclaimed doors.

Every one of those pieces brought a little age and character to the build. I love new materials when they make sense, but old doors and windows have a softness that’s hard to recreate. They make a building feel like it has always belonged there.

For the wire walls, we used hardware cloth and painted it black before installing it. This is one of those details that makes such a difference. Black hardware cloth is much easier to see through than shiny metal wire, so visually it almost disappears. That means the coop feels more open, and the view into the run is cleaner.
After the hardware cloth was installed, we trimmed out all the walls with 1/4-inch by 1 1/2-inch boards. The trim covered edges, added structure visually, and made the wire panels look finished instead of temporary.

We used a mix of stain and paint throughout the build. That choice came directly from the greenhouse inspiration. I didn’t want the coop to match in a stiff or overly perfect way, but I did want the buildings to feel related.
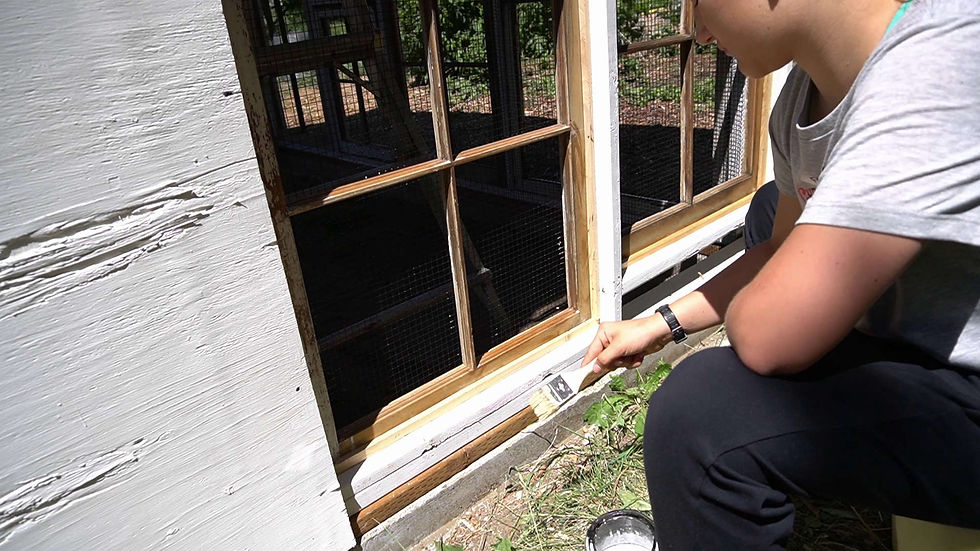
The combination of warm stained wood, painted areas, antique windows, and the copper roof helped tie everything together.
At this point, it stopped looking like a construction project and started looking like the coop I’d been picturing on paper.
The finishing stage included:
Installing antique window frames
Hanging reclaimed doors
Painting the hardware cloth black
Trimming the wire walls
Staining and painting the woodwork
Adding the copper metal roof
Checking that doors, windows, and access points worked smoothly
This part always takes longer than I think it will. Trim especially can be slow. But it’s also what makes a project feel complete. A simple board covering a seam can be the difference between “we built this ourselves” and “we built this ourselves, and it looks beautiful.”
Finishing the inside with practical and pretty details
After the main build was done, we moved on to the extras. These are the details that make the coop easier to use and more fun to walk into.

The headboard roost might be my favorite. I love when something old gets a new purpose, and a headboard makes such a charming roost. It adds personality while still doing a real job for the chickens.

We also added a hexagonal dust bath. Chickens need a place to dust bathe, and giving them a dedicated spot helps keep that behavior where I want it. The hexagon shape made it feel a little more special than a plain box, which is exactly the kind of unnecessary-but-delightful detail I enjoy.
The auto feeder was a practical addition. With a large family and a growing flock, anything that helps keep chores manageable is welcome. We still check on everything daily, but having a good feeding setup makes the rhythm smoother.

A storage cabinet also made the list. Feed scoops, small tools, supplements, grit, first aid supplies, and random chicken things need somewhere to live. Without storage, they always seem to end up scattered. Having a cabinet right in the coop keeps the space cleaner and more useful.
Then came the artistic touches. These are the small things that don’t always show up on a materials list, but they make the build feel personal. A special trim detail here, a pretty finish there, a reused piece with history, a shape that makes you smile.

Those are the things that bring joy to morning chores.
A chicken coop has to work hard. It needs to protect the flock, hold up to weather, allow airflow, make cleaning easier, and give chickens space to do normal chicken things. But if you can make it beautiful too, why not?
What I’d keep in mind for a coop build like this
If I were giving advice to someone planning a similar coop, I’d say to start with function, then layer in the charm.
The charm is what makes it fun, but the function is what makes you grateful later.
Plan where the eggs will be collected. Think about how bedding will come out. Make sure a wheelbarrow can get close. Add ventilation. Use strong wire. Build on a solid foundation. Brace carefully if you’re using a lot of hardware cloth walls. Find your reclaimed doors and windows before framing, not after.
Most of all, draw it out. Even a simple sketch on grid paper helps you catch problems before they become expensive or frustrating.
Here’s what made the biggest difference in our build:
Most practical choice
Most charming detail
Biggest visual upgrade
Most useful planning step
Best structural decision
Favorite interior feature
The wheelbarrow-height clean-out door
The reclaimed doors and antique window frames
The copper metal roof
Drawing the layout on grid paper
Taking time to build a square concrete foundation
The headboard roost
This coop took time, and there were plenty of steps that weren’t glamorous. Digging, forming concrete, checking square, adding braces, trimming wire panels, and working around old doors all require patience.

But now, when I walk out for barn chores, the coop feels like part of the property in the best way. It fits beside the greenhouse. It gives our chickens more room. It makes egg collection easy. It has storage, ventilation, character, and a roof I love.
And maybe best of all, it turned a daily chore into something that feels a little more beautiful.


Comments